
Before we start, I should point out that there is an easier way of dealing with this if you’re familiar with Python. Crowdstrike has the falconpy project where their entire API has been made available. I’d check that out first.
I did this purely for my own education and the fact I really don’t use Python. The fact it’s come in very useful is a happy by-product.
I am a Crowdstrike customer, and have been taking advantage of it’s ability to self update reliably. This comes with the catch that I must also update our management system every time there’s a new version. That gets tedious after a while, and it also potentially can cause issues if you miss a couple. (Organisations that are not updating regularly don’t have this issue … they have other issues instead.)
Mac Admin’s slack user @tlark shared some python code he’d written that was a wrapper around the Crowdstrike falconpy project. This got me thinking, and then experimenting since I don’t supply or even have a need for python in my own environment. Let the hacking begin.
tl;dr Performing API calls for Crowdstrike in zsh is very much like doing it for Jamf Pro. The syntax is just different enough to be awkward but the principle is the same. Have credentials -> Get bearer token -> Do operations -> Revoke token. Done.
You need to be a Crowdstrike customer first. Sorry, but your org is going to have to pay for this 😉
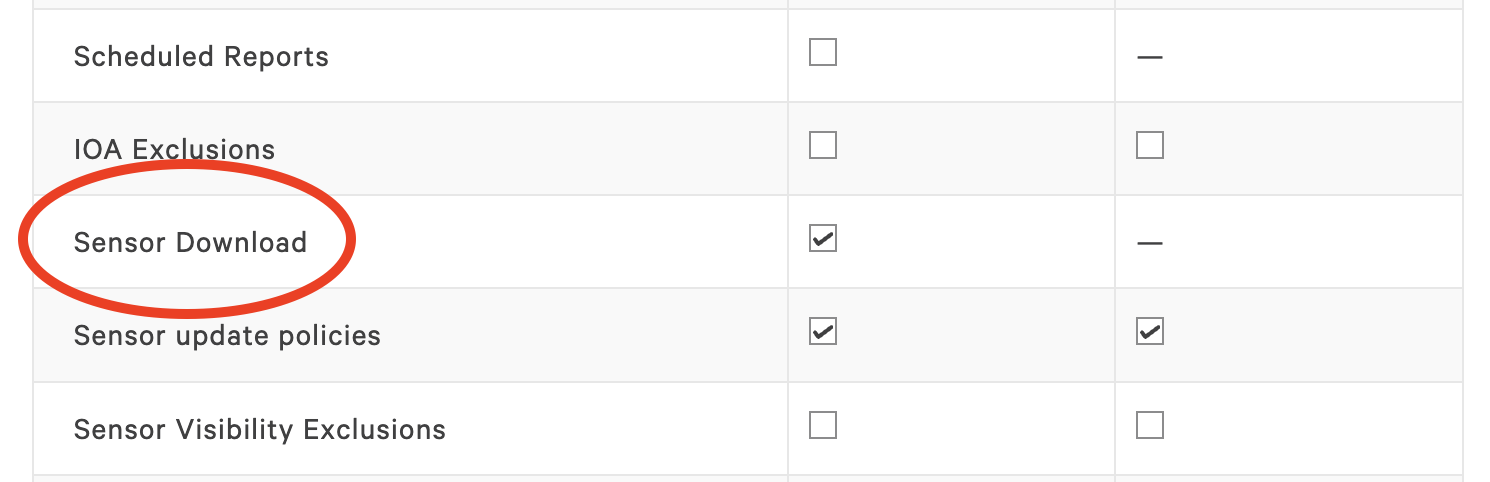
Start by creating a new API key. Crowdstrike will present a Client ID and a Client Secret number … once. Grab these and save them somewhere secure. Don’t lose these or you’ll have to generate them again. Also only grant the permissions you’re going to require, and in this case it’s just the Sensor Download permission.
Also keep this handy. https://assets.falcon.crowdstrike.com/support/api/swagger.html#/ This is the online swagger guide to the API. It’s missing some details in places, but it’s a good reference.
Some design considerations before we begin:
- Only supply the client ID and client secret to the script
- Auto detect the right API url to use
- Download retry ability in case of bad internet connection
- Ability to fail safe in case of really bad internet connection
- Ability to select a specific release of the client in accordance with policy. In my case, we are always on N-1 for production.
- Monterey onward support. No older OS.
I’m going to skip the obtaining of the bearer token and it’s revocation. It’s almost the same as my previous Jamf Pro articles.
Auto detecting the right API url to use was based on work by @DJ Padzensky who committed code to an InTune repo. I realized that his code could be made much simpler but he still deserves credit for this technique. (I was tipped off about this by @ChrisB-CS so thanks go to him as well!)
# Set a default URL
baseurl="https://api.crowdstrike.com"

# Now use this to work out the API base url
# Highly modified from @Dj Padzensky 's work which I was linked to PR
# on mac admin's slack
baseurl=$( /usr/bin/curl -s -v -X POST -d "client_id=${clientid}&client_secret=${secret}" "${baseurl}/oauth2/token" 2>&1 | awk '($2 == "Location:") {print $3}' | cut -d/ -f1-3 )
[ -z "$baseurl" ] && baseurl="https://api.crowdstrike.com"
What we’re doing here is to use the api.crowdstrike.com US-1 as a way to determine where we should be going. DJ worked out that the API endpoint will redirect to the appropriate correct endpoint. However it’s not good practice to rely on that always working, especially when the documentation provides a few others. However doing a basic oauth token request, then capturing the verbose output from curl and parsing it to get the “Location:” field means you get the correct URL.
So we read all that out and put it in the baseurl variable, replacing the url. If the variable ends up blank, no redirect occurred so we can put the original url back. We can work out after that the API endpoints we are going to use.
# API Base URL and the various endpoints we need
oauthtoken="$baseurl/oauth2/token"
oauthrevoke="$baseurl/oauth2/revoke"

# Define which version we want to get.
# 0 means latest. 1 is N-1, 2 is N-2 and so on.
version="1"

# Now define the API query we need
sensorlist="$baseurl/sensors/combined/installers/v1?offset=${version}&limit=1&filter=platform%3A%22mac%22"
sensordl="$baseurl/sensors/entities/download-installer/v1"
We’re covering a few things in this code block. First we take the baseurl from before and use it to work out the proper urls to do our oauth token request and revocation commands.
The sensordl variable is the easy one. We just need the download-installer endpoint.
sensorlist is the complex one. What we’re doing is to search for only the Mac platform clients, to limit to one result and finally to select an offset. The offset determines which N version you get. An offset of 0 means you get the latest release, 1 is the N-1 previous and so on. Having this selectable in the script comes in handy!
We have all the information we require to start the process. The following code black uses the sensorlist variable we worked out previously and reads the output into a variable. We can then use the two following plutil statements to 1) extract the sha256 hash of that installer and 2) it’s actual filename in Crowdstrike.
# Work out the CrowdStrike installer, grab the SHA256 hash and use that to download that installer
sensorv=$( /usr/bin/curl -s -X GET "$sensorlist" -H "accept: application/json" -H "authorization: Bearer ${bearer}" )
sensorname=$( /usr/bin/plutil -extract resources.0.name raw -o - - <<< "$sensorv" )
sensorsha=$( /usr/bin/plutil -extract resources.0.sha256 raw -o - - <<< "$sensorv" )
We have the sensor installer sha256 hash, it’s filename and the appropriate credentials. Now use curl to download it to the /private/tmp folder. The finished code has download checks using the -w switch for the http response code.
/usr/bin/curl -s -o /private/tmp/${sensorname} -H "Authorization: Bearer ${bearer}" -w "%{http_code}" "${sensordl}?id=${sensorsha}"Now that the pkg is downloaded, you can invalidate your bearer token and then perform any other actions you require before installation. The final code with download checks and other embellishments is below:
#!/bin/zsh

# Download latest specified Crowdstrike pkg and install
# [email protected] - 05/03/2022

# Client ID, Client Secret for the API token. Then make a base64 version.
clientid=""
secret=""
b64creds=$( printf "$clientid:$secret" | /usr/bin/iconv -t ISO-8859-1 | /usr/bin/base64 -i - )

# Set a default URL
baseurl="https://api.crowdstrike.com"

# Now use this to work out the API base url
# Highly modified from @Dj Padzensky 's work which I was linked to PR
# on mac admin's slack
baseurl=$( /usr/bin/curl -s -v -X POST -d "client_id=${clientid}&client_secret=${secret}" "${baseurl}/oauth2/token" 2>&1 | awk '($2 == "Location:") {print $3}' | cut -d/ -f1-3 )
[ -z "$baseurl" ] && baseurl="https://api.crowdstrike.com"

# API Base URL and the various endpoints we need
oauthtoken="$baseurl/oauth2/token"
oauthrevoke="$baseurl/oauth2/revoke"

# Define which version we want to get.
# 0 means latest. 1 is N-1, 2 is N-2 and so on.
version="1"

# Now define the API query we need
sensorlist="$baseurl/sensors/combined/installers/v1?offset=${version}&limit=1&filter=platform%3A%22mac%22"
sensordl="$baseurl/sensors/entities/download-installer/v1"

# Request bearer access token using the API
token=$( /usr/bin/curl -s -X POST "$oauthtoken" -H "accept: application/json" -H "Content-Type: application/x-www-form-urlencoded" -d "client_id=${clientid}&client_secret=${secret}" )

# Extract the bearer token from the json output above
bearer=$( /usr/bin/plutil -extract access_token raw -o - - <<< "$token" )

# Work out the CrowdStrike installer, grab the SHA256 hash and use that to download that installer
sensorv=$( /usr/bin/curl -s -X GET "$sensorlist" -H "accept: application/json" -H "authorization: Bearer ${bearer}" )
sensorname=$( /usr/bin/plutil -extract resources.0.name raw -o - - <<< "$sensorv" )
sensorsha=$( /usr/bin/plutil -extract resources.0.sha256 raw -o - - <<< "$sensorv" )

# Download the client. Retry if required up to 10 times.
for loop in {1..10};
do
	echo "Download attempt: [$loop / 10]"
	test=$( /usr/bin/curl -s -o /private/tmp/${sensorname} -H "Authorization: Bearer ${bearer}" -w "%{http_code}" "${sensordl}?id=${sensorsha}" )
	[ "$test" = "200" ] && break
done

# Invalidate access to the bearer token
/usr/bin/curl -X POST "$oauthrevoke" -H "accept: application/json" -H "authorization: Basic ${b64creds}" -H "Content-Type: application/x-www-form-urlencoded" -d "token=${bearer}"

# Did the download actually work. Error if not.
[ "$test" != "200" ] && { echo "Download failed. Exiting."; exit 1; }

# Finally install and clean up
/usr/sbin/installer -target / -pkg /private/tmp/${sensorname}
/bin/rm /private/tmp/${sensorname}

# All done!
exit 0
And with that, you can have a script that automatically downloads the correct Crowdstrike sensor installer on demand! As long as you’re a customer, that is 😉