Wow. After much success with Jamf, then CrowdStrike I turned my attention to BeyondTrust Remote Support. How difficult could be it be?
Dumb question.
tl;dr here’s the github link to the finished script repo.
Installing BeyondTrust Remote Support client has some .. fairly unique challenges. Let me list the ways:
- The deployable client is supplied as a .dmg file
- The installer is a binary inside an .app bundle
- The installer has an expiry time that can range from a few minutes to a year
- The installer has other settings that can be called either during generation or at install time
- Upon success or failed install, it will delete itself from the computer (both Win and Mac!)
- The installer must be run from the dmg
- Finally the dmg must have exactly the right filename or it will error out
So, still not the worst installer I’ve ever come across. (Shout out to @foigus on Mac Admins Slack for worse ones).
Despite all of this, I actually really like the product. It behaves so much better than the others I’ve been forced to use over the years.
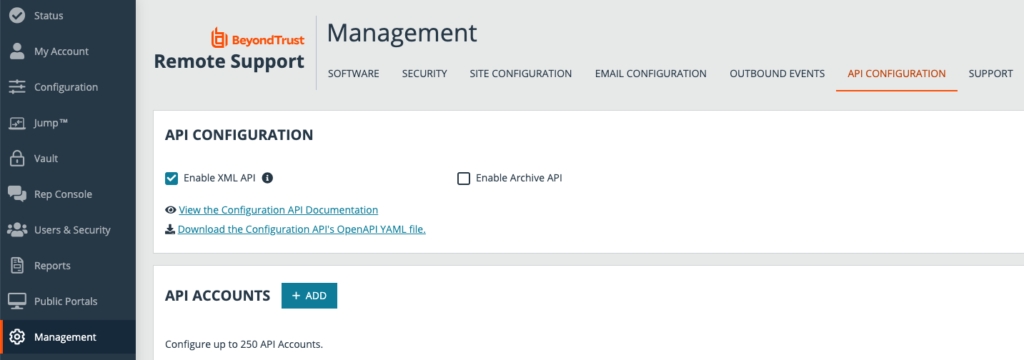
Before we get to the script, we have to get appropriate API access on the BeyondTrust console. Assuming you’re admin, or can ask the right person then in the Management tab, select API Configuration and check the Enable XML API option.
The XML is a lie. All the output is JSON.
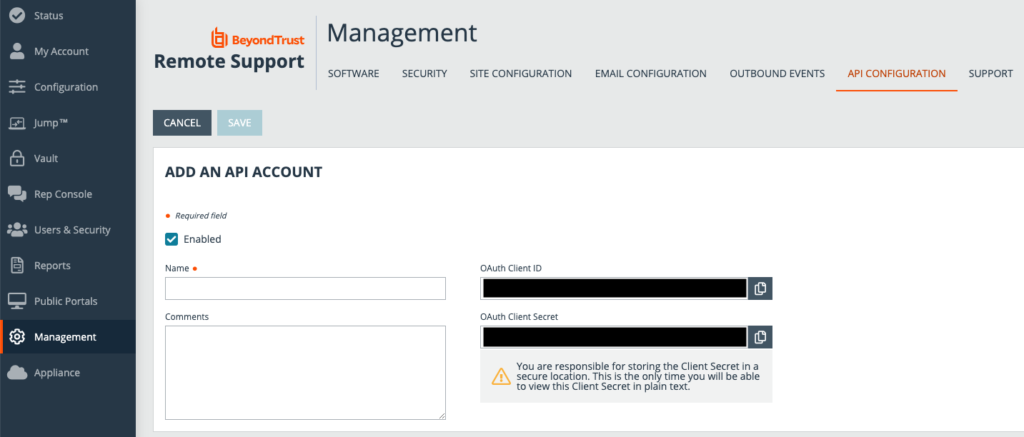
Add an API account. Give it a suitable name and description. Copy out the OAuth Client ID and Secret and store them securely in a credential vault. If you lose them you’ll have to regenerate them as there’s no retrieving them past this screen.
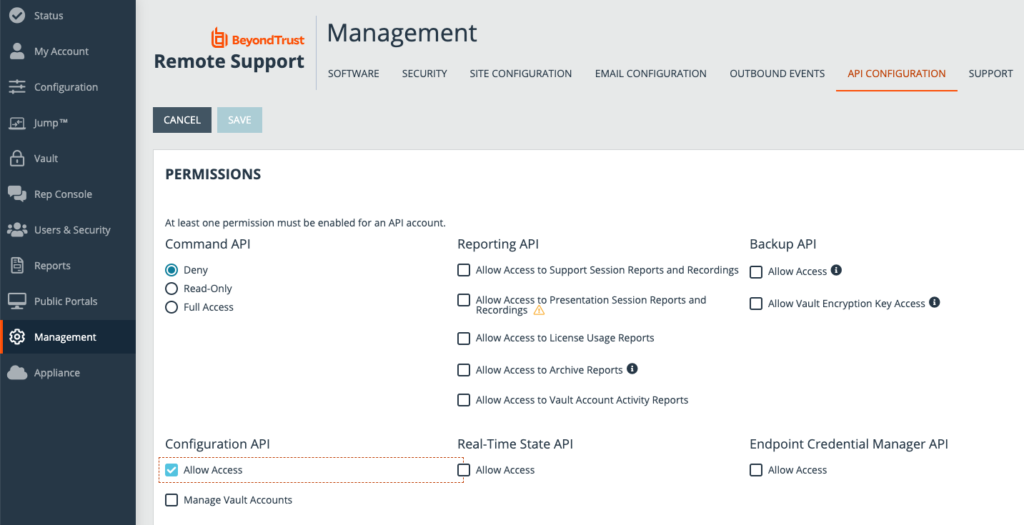
Permissions time. We must make sure we have only the required level to work a few things out and download. Untick everything other than Configuration API – Allow Access. Command API should be set to Deny.
Once you have all of that, you’re ready for the script I linked above.
At the top here are the variables for the OAuth token id and secret from before. It is highly recommended to use something like Hashicorp Vault to securely store these rather than just baking them into the script. This is more for clarity for this article.
You’ll also need to configure your BeyondTrust URL here as well as the name of the Jump Group that you want to generate the installer for.
I’m going to skip the generating of the access bearer token for the API. It’s no different to previous posts in the “fun and profit” series. However it goes off the rails from this point.
First step is to take the jumpgroupname variable and then convert that human readable name into an ID number. To do that we must first grab a list of all the jump groups that exist with this command.
This returns a giant block of json. The issue is each group is placed as it’s own self contained dictionary in the output. Since this effectively multiple json files stuffed into one, this format makes it impossible to parse with the built in macOS tools like the javascript parsing tools or even plutil in macOS 12 onward.
This calls for brute force and ignorance. I don’t like this solution but it works.
The output of all that horridness is the ID number we require. Why do we need a number rather than a name? Well the next step is to tell the API to generate the installer and key_info files for a specific jump group ID rather than name. We also need to configure the client for settings such as attended or unattended session policies. There’s also the question of how long we want this installer to be valid for, but since this is a one off it doesn’t have to be long. Also setting it to install quietly is a bonus. We accomplish all this by generating a JSON config and passing it to the API.
NOTE: Since I originally posted this article, BeyondTrust changed the expected JSON format slightly from v22.2.2. Integers no longer require quote marks and upload will fail if you include them. Github repo has been updated.
Then parsing out the two items we need from the output. This is the first time we’ve had valid JSON output from this API so far.
Quick stop: The installer id generated here is used in another call to download the installer. The key info is then used to dynamically name the downloaded file otherwise it will complain during installation.
We finally have all the information we need to download this thing! Let’s set up a loop to go a maximum of 10 times, get the http output from curl and do a test for a successful download. Immediately we should check after the loop to ensure we got the download ok. This is just safety for remote deployments at people’s homes with bad internet.
I’m going to leave a chunk out here but essentially we’re testing for an existing install and then hit it with an uninstall command. That usually stops existing devices having duplicate records appearing in the BeyondTrust Representative Console. This covers 70% of duplication cases.
BeyondTrust can install in a couple of locations: Shared folder and the Application folder. It also hides itself in a folder with a randomly generated ID in the name. So we use the find command to look for any sdcust binaries instead (could be more than one) and then hit it with the uninstall silent switch.
The other way that we get duplicate device records is the device was wiped and reinstalled. Now I’m in an environment that has consistent and repeatable hostnames, unique for every device. As a result, it’s time for another API query to see if an existing record exists and then delete it if it does.
Sadly the output from this API comes in a set of quotes that stops searching with default tools. However that’s easily fixed by using sed to nuke them out. Once we’ve fixed the output we can then extract the device ID number.
To recap: we’ve worked out how to download the client, we’ve downloaded it, cleaned up any existing installs and hopefully cleaned out any now dead records from the BeyondTrust console. We can actually install it now.
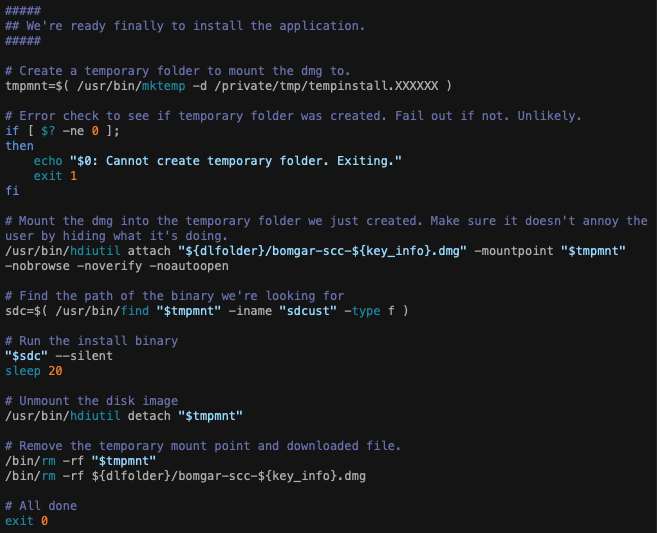
Now it’s a case of creating a mount point with a semi random name. Check to see if the folder creation worked. Mount the dmg we downloaded earlier and attach it to the mount point silently. Finally find the sdcust binary, run it silently and wait 20 seconds for everything to finish. Finally unmount the dmg, delete the mount point and the dmg.
And finally we are done! This was 2.5 days of solid effort to work out! The json parsing issues giving the most headaches.
Big thanks go to @tlark and @pico on the Mac Admins Slack for some of the suggestions. I only went to this level of trouble is because I have certain environment restrictions that I can’t just deploy 3rd party clients out to all. Hence doing things the hard way.
At least I won’t have to repack the client every time we upgrade the service now 🙂
